What is ntopng
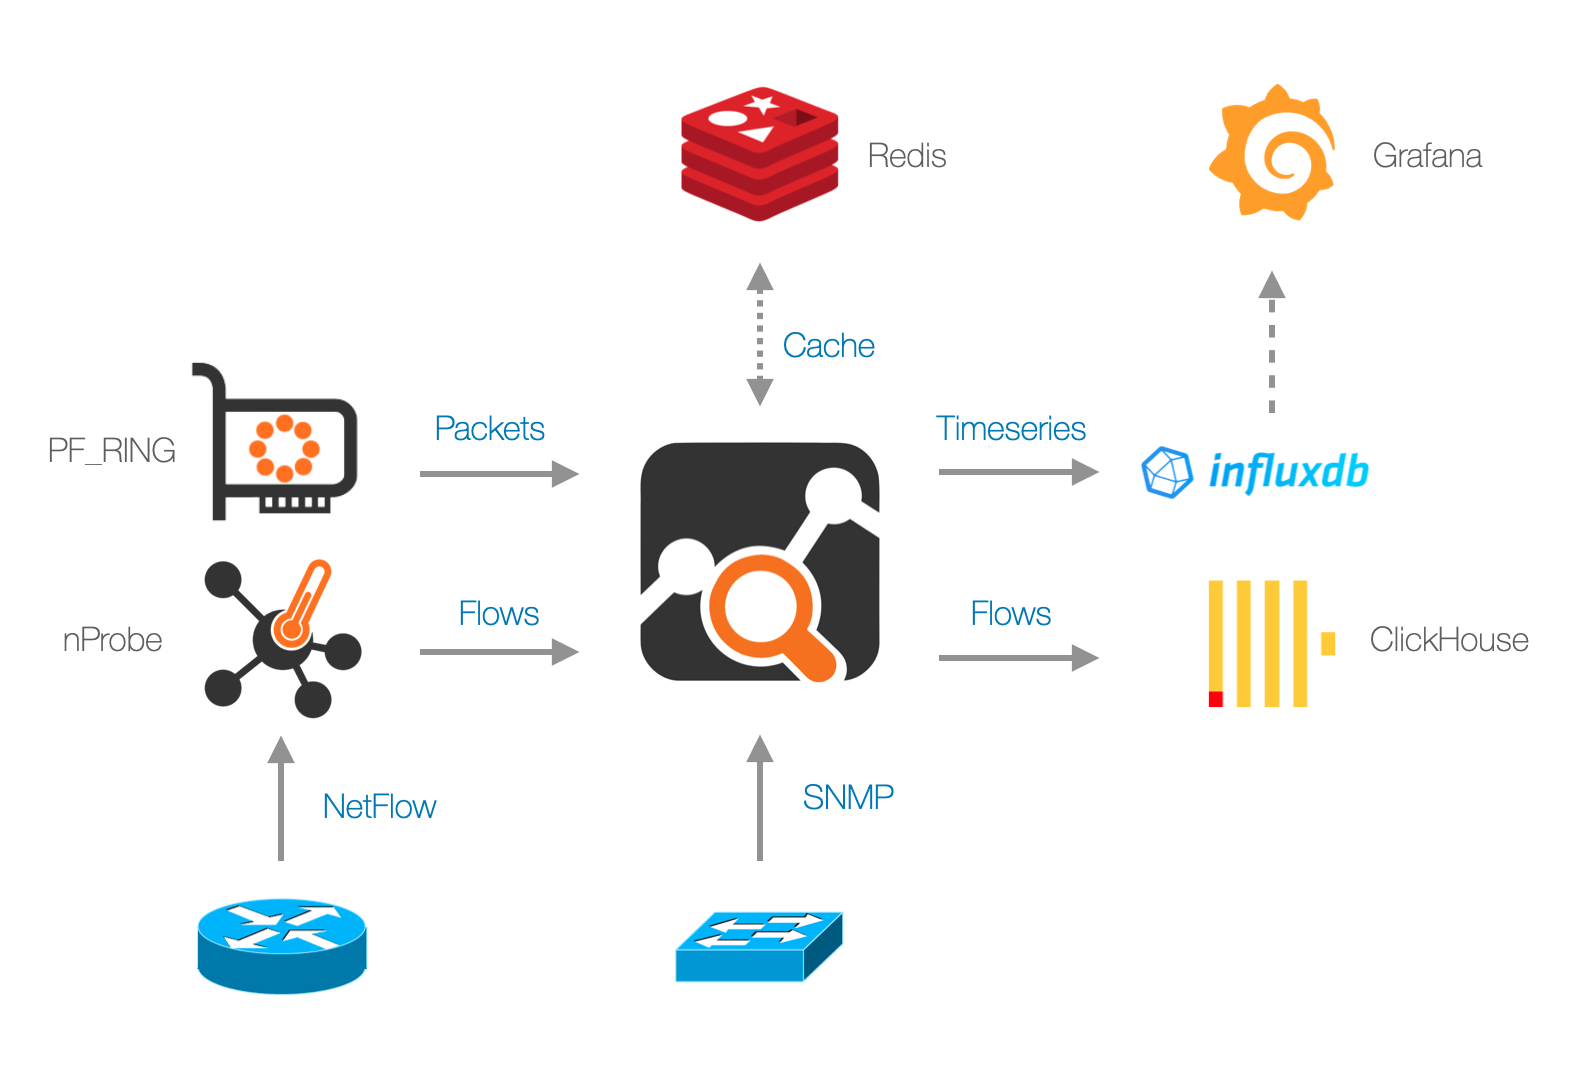
ntopng is a web-based traffic monitoring application able to:
- Passive monitor traffic by passively capturing network traffic
- Collect network flows (NetFlow, sFlow and IPFIX)
- Actively monitor selected network devices
- Monitor a network infrastructure via SNMP
The main difference between ntopng and a traffic collector, is that ntopng not only reports traffic statistics but it also analizes the traffic, draws conclusions on observed traffic type and reports cybersecurity metrics.
Releases and Features
ntopng development lifecycle is typically 6 to 9 months. The history of changes and features implemented by every release, is available on its Changelog.
Installing on Linux
Installation instructions can be found at http://packages.ntop.org/. Development and stable builds are available. Stable builds are intended for production environments whereas development builds are intended for testing or early feature access.
Installing on MacOS
MacOS installation packages can be found at
http://packages.ntop.org/ and are installed with a GUI.
ntopng requires Redis to be installed in order to start. During the ntopng installation,
if Redis is not present, Redis is installed and activated, otherwise the one already installed on
the system is used. After the installation, ntopng is started and active on local port 3000
(i.e. ntopng is available at http://127.0.0.1:3000). If you want to uninstall ntopng you can
open a terminal and type sudo /usr/local/bin/ntopng-uninstall.sh
To enable geolocation, MacOS packages require database files to be manually placed under /usr/local/share/ntopng/httpdocs/geoip
. Detailed instructions on how to obtain database files and install them are available at https://github.com/ntop/ntopng/blob/dev/doc/README.geolocation.md/. Once the files have been downloaded and placed in the folder, a restart of ntopng is necessary to read load them.
The ntopng configuration file is installed in /usr/local/etc/ntopng/ntopng.conf that can be edited (as privileged user) with a text editor.
The ntopng service can be started/stopped using the launchctl command:
- [Start]
sudo launchctl load /Library/LaunchDaemons/org.ntop.ntopng.plist
- [Stop]
sudo launchctl unload /Library/LaunchDaemons/org.ntop.ntopng.plist
Installing on Windows
Only the development build binary is available for Windows. The binary can be downloaded from the Windows package repository.
Download the ntopng zip
file from the link above, locate it in
the filesystem, and unzip it to access the actual ntopng
installer. Double-click on the installer. The installation procedure
will start and ntopng will be installed, along with its dependencies.
The installation procedure installs
- ntopng
- Redis
Note
If upgrading from an earlier version of ntopng for Windows, it is safe to skip the installation of any ntopng dependency. It is safe to respond ‘No’ or click ‘Cancel’ when prompted to install Redis.
The ntopng installer comes without capture drivers. You need to install manually npcap drivers BEFORE you install ntopng. If Wireshark is already installed on Windows, then npcap drivers are already installed and no driver installation is necessary.
During npcap installation you need to select “Install Npcap in WinPcap API-compatible Mode”.
In case you see a message as the one below
it means that your capture drivers have not been properly installed and that you have to install them as described in this section.
Installing on FreeBSD
Installation instructions can be found at http://packages.ntop.org/.
Installing on OPNsense/pfSense
OPNsense installation instructions are available in the OPNsense integration page. pfSense installation instructions are available in the pfSense integration page.
Note
On some versions, the redis package comes with a default configuration that is suboptimal for OPNsense/pfSense. Please edit /usr/local/etc/redis.conf and check the line dir /var/db/redis/ that specifies where redis leeps the database. Such database must be on persistent storage (i.e. the disk) and not in the ramdisk as for instance on pfSense. In this case you can fix he problem setting it to dir /var/db/pkg/ntopng/ or to any other appropriate directory that is on persistent storage and not in ramdisk.
Warning
Please remember that OPNsense/pfSense devices have often limited resources. If you have to monitor a large network, we suggest you to consider running nProbe (that has limited resources usage and do not need disk stoage for keeping historical data) on OPNsense/pfSense that exports flow towards ntopng running on an host on the LAN that has more resources available.
Software Updates
General instructions for updating the software can be found at http://packages.ntop.org/ together with the installation instructions. Depending on the Operating System, ntopng supports also automatic updates through the GUI as described in the below sections.
Updating the Software on Linux
Instructions for updating the software via command line can be found at http://packages.ntop.org/. For example on Ubuntu/Debian systems the below commands will update the repository, check for updates and install the latest software update if any:
apt-get update
apt-get upgrade
Alternatively, it is also possible to check for software updates through the Web interface using the top-right menu as shown in the picture below. The system automatically checks for new updates overnight and report the new version if any. Otherwise it is also possible to force the check for new versions by clicking on Check for updates and waiting a few seconds (up to 1 minute) for the check to be performed.
In the same menu, whenever a new ntopng version is available, it is possible to install it by clicking on Install update, as depicted below.
It is also possible to configure ntopng to self-update itself overnight, this can be enabled through Settings > Preferences > Updates. By default ntopng does not update itself overnight as it requires restarting the service, but if you want you can enable this preference and let ntopng do everything automatically.
Available Versions
The ntopng software comes in four versions: Community, Professional, Enterprise M, Enterprise L, and Enterprise L Bundle. Each version unlocks additional features with respect to the smaller one.
The full list of features and differences between versions is available in the ntopng Product Page.
ntopng Community
The Community version is free to use and open source. The full source code can be found on Github.
ntopng Professional
The Professional version offers some extra features with respect to the Community, which are particularly useful for SMEs, including graphical reports, traffic profiles and LDAP authentication.
ntopng Enterprise M
The Enterprise M version offers some extra features with respect to the Professional version, which are particularly useful for large organizations, including SNMP support, advanced alerts management.
ntopng Enterprise L
The Enterprise L version offers some extra features with respect to the Enterprise M version, including fast ClickHouse export, historical data explorer and analysis, Identity Management (the ability to correlate users to traffic).
ntopng Enterprise L Bundle
The Enterprise L Bundle unlocks ntopng Enterprise L, nProbe Pro (Flow Collection), and n2disk 1 Gbit (Continuous Recording).
Warning
ntopng and nProbe must be on the same machine to have them unlocked with the ntopng Enterprise L Bundle license. The bundle license must be placed under /etc/ntopng/ntopng.license
.
Licensing
The Community edition does not need any license. Professional and Enterprise versions require a license. ntopng automatically switches to one of these four versions, depending on the presence of a license.
License is per-server and is released according to the EULA (End User License Agreement). Each license is perpetual (i.e. it does not expire) and it allows to install updates for one year since purchase/license issue. This means that a license generated on 1/1/2021 will be able to activate new versions of the software until 12/31/2021. If you want to install new versions of the software release after that date, you need to renew the maintenance or avoid further updating the software. For source-based ntopng you can refer to the GPL-v3 License.
ntopng licenses are generated using the orderId and email you provided when the license has been purchased on https://shop.ntop.org/.
Once the license has been generated, it can be applied to ntopng simply by visiting page “Settings”->”License” of the web GUI and pasting the license key in the license form.
Alternatively, the license key can be placed in a one-line file
ntopng.license
:
- On Linux, the file must be placed in
/etc/ntopng.license
- On Windows, the file must be placed in
Program Files/ntopng/ntopng.license
Note
An ntopng restart is recommended once the license has been applied to make sure all the new functionalities will be unlocked.